Trips
In the "Trips" section under "Bus Transport" in the AllRide application, users can view a comprehensive list of all the trips that have been organized, which includes trips created by customers, drivers, or administrators. Here's the flow and information you'll find in this section:
Details Displayed
- Trip Date: Day, date, and time of the trip.
- Start station: Bus station from which the passenger will board the bus.
- End station: Destination bus station.
- Assigned Vehicle: The vehicle allocated for the trip is listed by its identification number or code.
- Driver: The name of the driver assigned to the trip is displayed here.
- Status: Indicates the stage of the trip's lifecycle, such as 'Created', which means the trip is logged into the system but not yet active, or 'Published', meaning the trip is confirmed and scheduled.
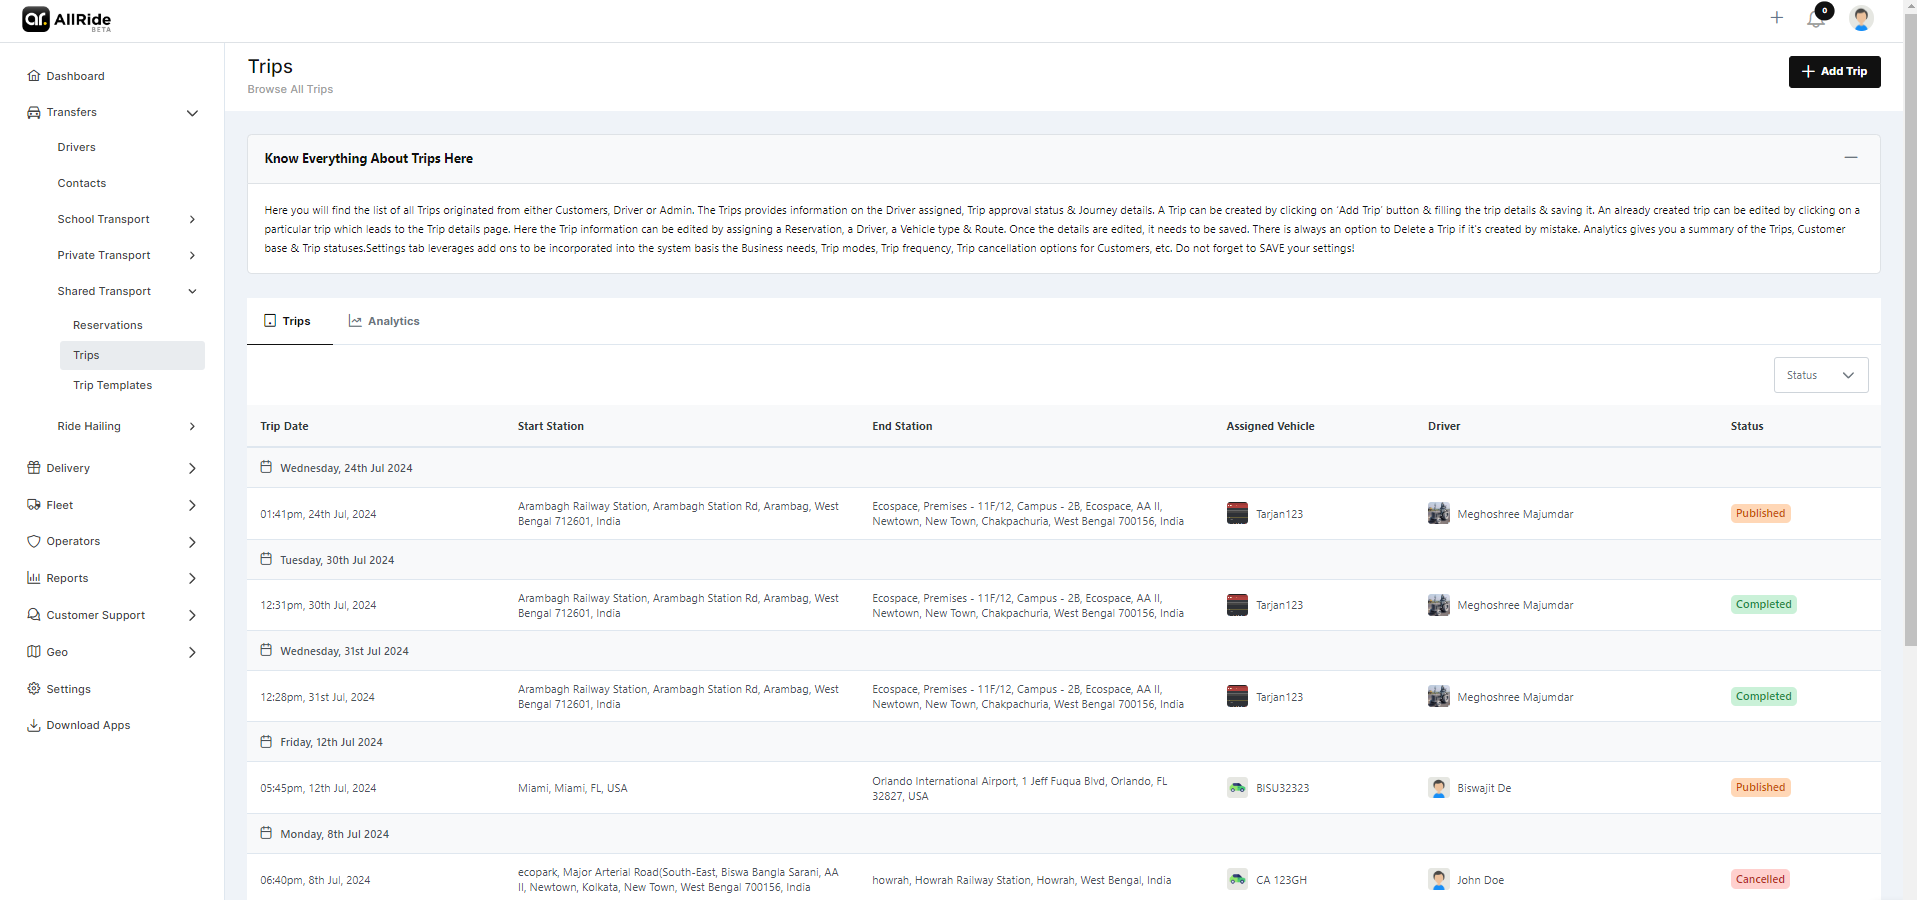
Navigation
- Pagination Controls: At the bottom, these controls let users navigate through multiple pages if there are more trips than can be displayed on a single page. This section is designed to give users a clear and actionable interface for managing the various aspects of bus trips within the platform.
Trip details:
Upon selecting a trip from the list, you're taken to a page that details the specific journey you're examining. The layout of the page provides thorough insights into the trip's elements as follows:
Map Visualization:
- At the top, you'll find a dynamic map highlighting the route for visual orientation, showing the journey from the start station to the end station, along with any stops in between.
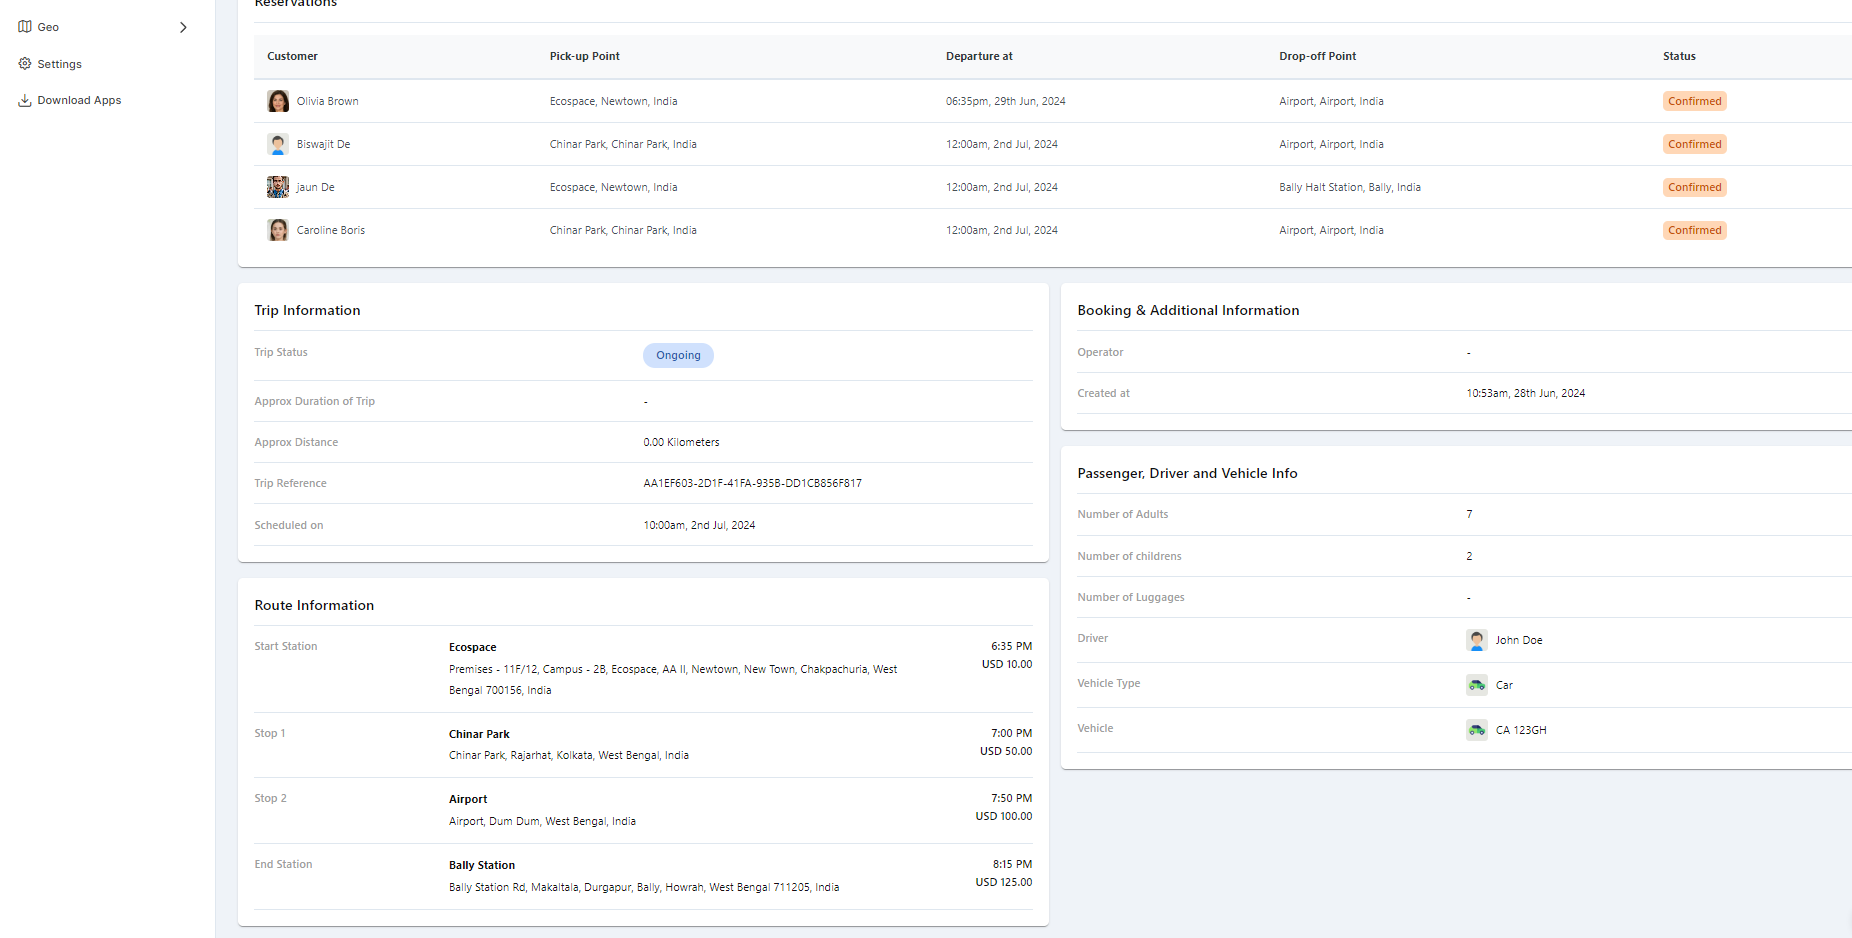
Reservations Overview:
- This section gives a snapshot of who has booked the trip, the pick-up and drop-off locations, the departure time, and the current status of the trip, which might include states like 'Published', 'Scheduled', or 'Completed'.
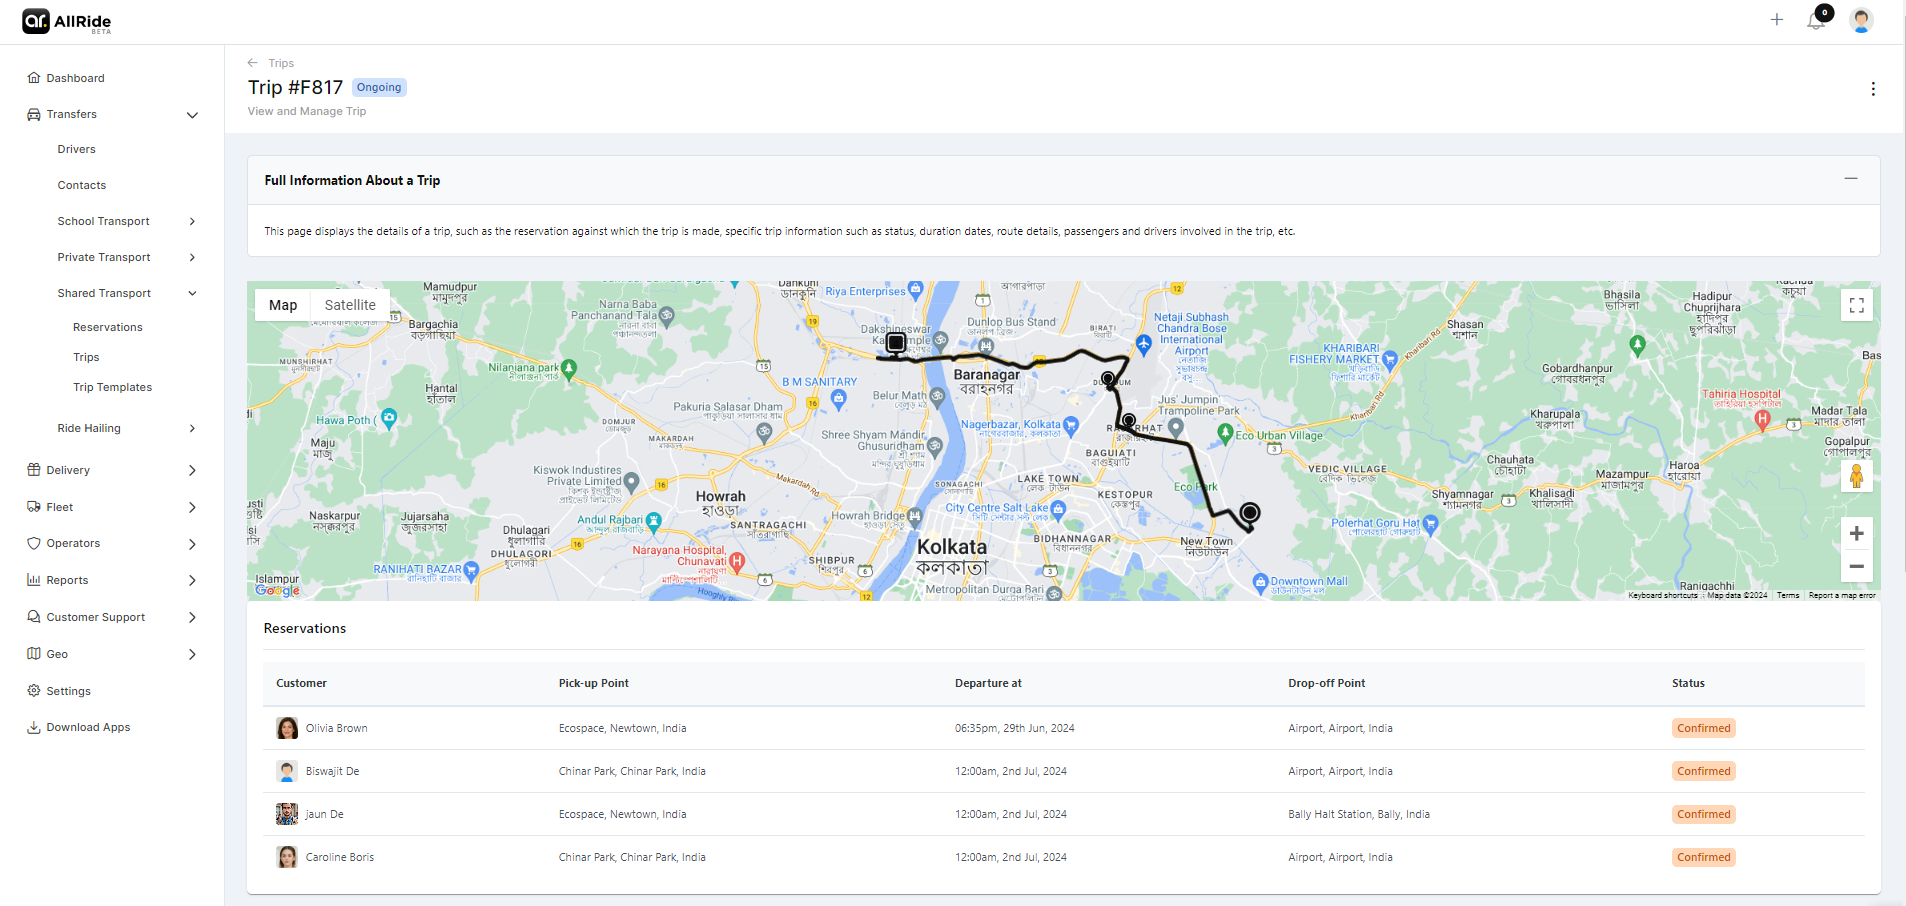
Trip Information:
- Trip Status: Displays whether the trip is active, pending, or completed.
- Approx Duration of Trip: This will detail how long the trip took once completed.
- Approx Distance: Reflects the total distance of the trip route.
- Trip Reference: Provides a unique identifier for this specific trip.
- Scheduled on: The scheduled time when the trip is supposed to begin.
Route Information: Gives an overview of the bus trip, station by station.
Booking & Additional Information:
- Operator: The entity or organization managing the trip.
- Created at: The timestamp of when the trip entry was first created.
Passenger, Driver, and Vehicle Info:
- Number of Adults/Children/Luggage: The number of passengers by age group and their luggage.
- Driver: The designated driver for the trip.
- Vehicle Type: The class or model of the vehicle used for the trip.
- Vehicle: The specific vehicle assigned, identified by its code or registration.
Edit Functionality
This option permits modifications to the trip details. By clicking 'Edit', you can update any part of the trip's information, such as changing the route, rescheduling the start time, or assigning a different vehicle or driver.
Delete Functionality:
Should there be a need to remove the trip entirely, the 'Delete' function enables this action. This might be used in cases where a trip has been canceled or entered in error.
Add Trip:
When creating a trip within the system, you will be guided through a step-by-step process to select the necessary information for each aspect of the trip. Here's how you can go about selecting the details accordingly:
1. Journey Date / Time: Select the date and time of the trip
2. Assign Route:
-
-
- Click on 'Select Route'.
- This will allow you to set the specific route for the trip. Depending on the system, this may include predetermined routes or the option to create a custom route based on the trip’s start and end points.
- Select the appropriate route that matches the reservation details and meets the passenger's needs.
- Throughout this process, the system will guide you through each selection to ensure that all the necessary details are covered for the trip. Once you've made all the selections, you can review the details and then save the trip by clicking the 'Save' button, or choose 'Cancel' if you need to exit without saving.
-
3. Assign A Driver:
-
-
- Click on 'Select Driver' to assign a driver to the trip.
- You will see a roster of available drivers along with relevant information such as their driving schedule, ratings, or proximity to the trip’s starting point.
- Pick a driver who is available at the scheduled time and is suitable for the journey.
-
4. Assign A Vehicle:
- After selecting the reservation, proceed by clicking 'Select Vehicle'.
- This will bring up a list of available vehicles in the fleet. The list may include details like vehicle type, capacity, and availability status.
- Select the vehicle that best fits the requirements of the reserved trip.
5. Assign Operator:
-
-
- By clicking 'Select Operator', you can assign the trip to an operator, which could be a person or a dispatch team responsible for overseeing the trip.
- From the list, choose the operator who will manage the trip's logistics, ensuring they have the capacity and resources to do so effectively.
-
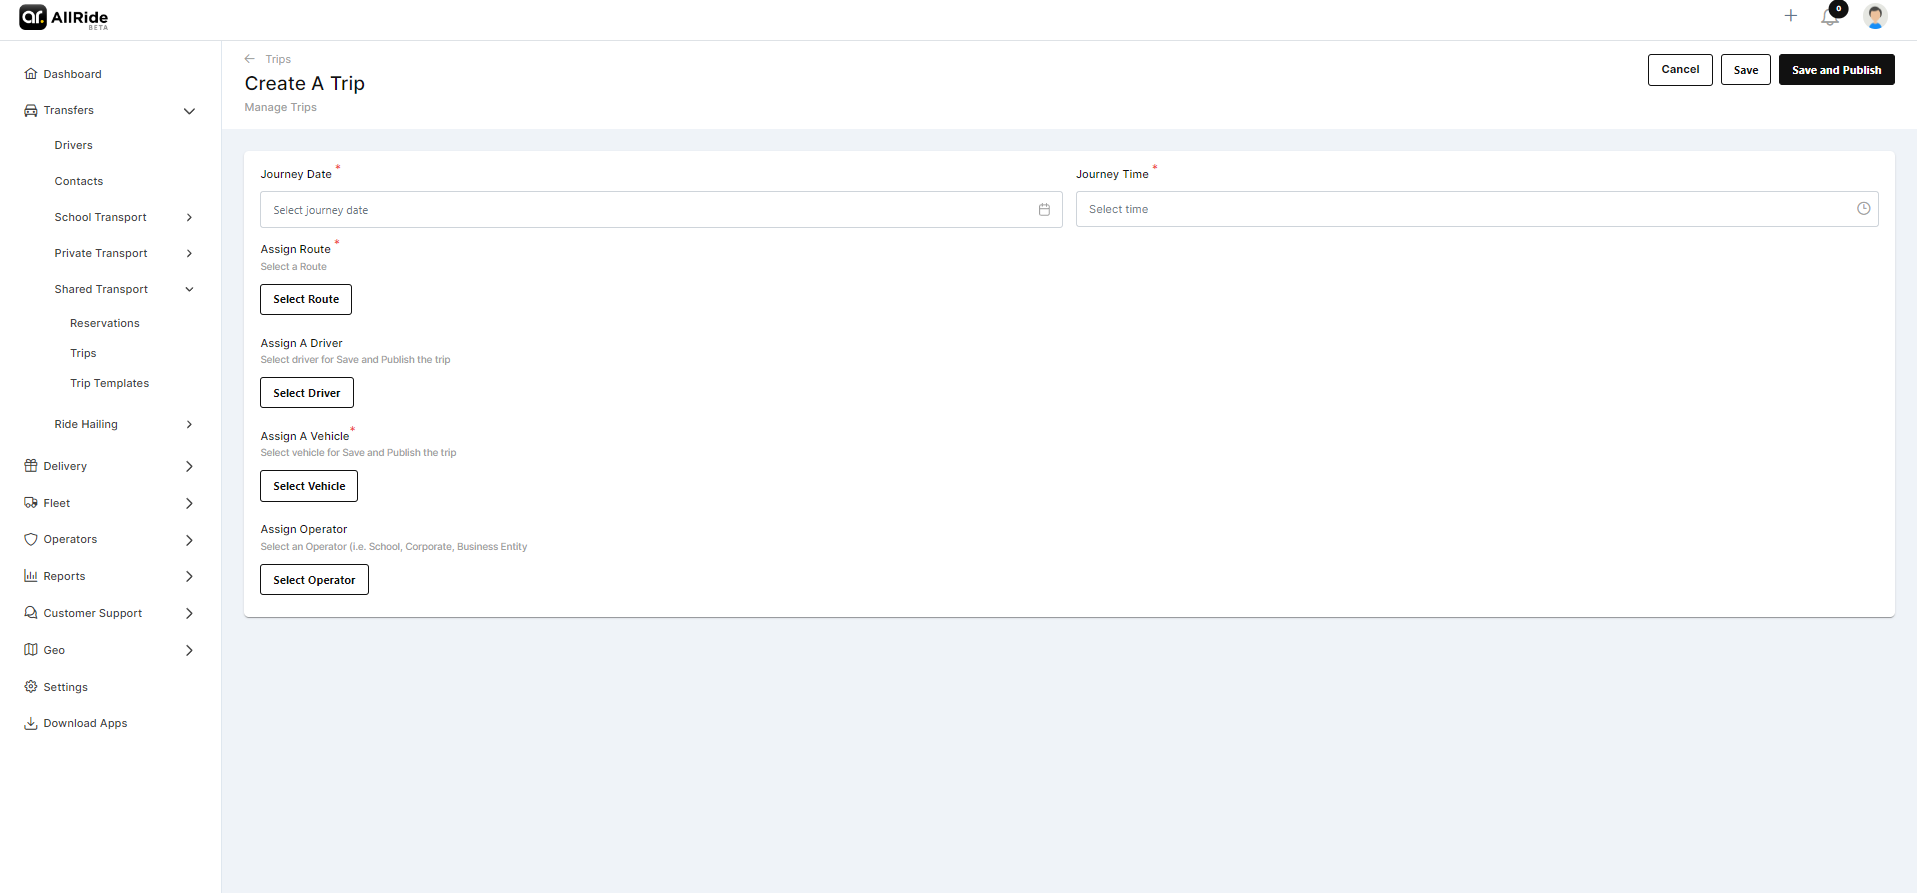
Click 'Save' or 'Save and Publish' when you are done.